Tuesday, June 1, 2021

SOLID principles

In object-oriented programming languages, the classes are the building blocks of any application. If these blocks are not strong, the the application is going to face a tough time in the future.

Poorly designed applications can cause difficult situations when the application scope goes up.

A set of well designed and written classes can speed up the coding process.

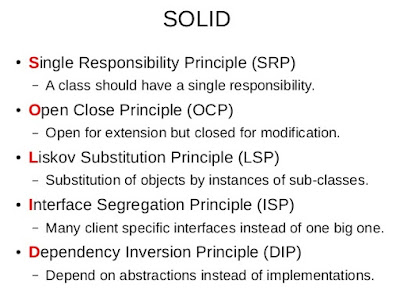
In this tutorial, We will learn the SOLID principles which are 5 most recommended design principles, that we should keep in mind while writing our classes.


1) Single Responsibility Principle (SRP)

  • The single responsibility principle states that "One class should have one and only one responsibility."
  • Implementation of multiple functionalities in a single class can mess up the code and if any modification is required may affect the whole class.
  • Let's understand the single responsibility principle through an example.

Suppose, Employee is a class having three methods namely printDetails(), calculateSalary(), and addEmployee(). Hence, the Employee class has three responsibilities to print the details of Employee, calculate Salary, and add employee. By using the single responsibility principle, we can separate these functionalities into three separate classes to fulfill the goal of the principle.

 1
 2
 3
 4
 5
 6
 7
 8
 9
10
11
12
13
public class Employee {
	public void printDetails() {
		// functionality of the method
	}

	public void calculateSalary() {
		// functionality of the method
	}

	public void addEmployee() {
		// functionality of the method
	}
}

The above code snippet violates the single responsibility principle. To achieve single responsibility principle, we should implement a separate class that performs a single functionality only.  

 1
 2
 3
 4
 5
 6
 7
 8
 9
10
11
12
13
14
15
16
17
18
public class Employee {
	public void Employee() {
		// functionality of the method
	}
}

public class PrintEmployeeDetails {
	public void printDetails()
	{
		// functionality of the method
	}
}

public class Salary {
	public void calculateSalary() {
		// functionality of the method
	}
}
Here, we have achieved the goal of the single responsibility principle by separating the functionality into three separate classes.


2) Open-Closed Principle
  • The Open-Closed Principle (OCP) states that classes should be open for extension but closed for modification. 
  • "Open to extension" means that you should design your classes so that new functionality can be added as new requirements are generated. 
  • "Closed for modification" means that once you have developed a class you should never modify it, except to correct bugs.
  • Let's understand the single responsibility principle through an example.
  • Suppose, CoffeMachine is a class having two methods namely grindCoffee(), makeCoffee(). If you want additional feature to pour coffee in a mug, by making another subclass extending from the CoffeeMachine class we can fulfill the goal of the principle.

     1
     2
     3
     4
     5
     6
     7
     8
     9
    10
    11
    12
    13
    14
    public class CoffeeMachine {
        public void grindCoffee(){
            // Grind the coffee
        }
        public void makeCoffee(){
            // Brew the coffee
        }
    }
    
    public class PourIntoCup extends CoffeeMachine{
        public void pour(){
            // Pour into cup
        }
    }
    

3) Liskov Substitution Principle
  • Derived classes must be completely substitutable for their base classes.
  • As the name suggests, Liskov Substitution Principle prescribes substitutability of a class by its subclass. 
  • Java inheritance mechanism follows Liskov Substitution Principle.
  • Let's say we have a class Vehicle and its two sub-classes Car & Bus as shown below:
 1
 2
 3
 4
 5
 6
 7
 8
 9
10
11
12
13
14
15
16
17
18
19
20
21
22
23
24
25
26
27
28
29
30
31
32
33
34
35
class Vehical {
	void getSpeed() {
		
	}
	void getMilage() {
		
	}
}

class Car {
	void getSpeed() {
		
	}
	void getMilage() {
		
	}
}

class Bus {
	void getSpeed() {
		
	}
	void getMilage() {
		
	}
}

class UsingLiskov {
	public static void main(String[] args) {
		Vehical vehical = new Car(); 
		vehical.getSpeed();
		vehical = new Bus();
		vehical.getMilage();
	}
}

We can assign an object of type Car or Bus to a reference of type Vehicle. All the functionality in base class i.e. Vehicle, and is acquired by Bus and Car via inheritance, can be invoked on a reference of type Vehicle. 

This is exactly what the Liskov Substitution Principle also states – subtype objects can replace super type objects without affecting the functionality inherent in the super type. 

The classic example which violates Liskov Substitution Principle is explained below

 1
 2
 3
 4
 5
 6
 7
 8
 9
10
class Car{
  void move( int meters ) {...}
  void refuel( int litters ) {...}
}

class ElectricCar extends Car
{
  void move( int meters ) {...}
  void refuel( int litters ) {...}
}

This violates Liskov Substitution Principle since an electric car is not fueled by litters metrics, but the contract of the Car class states that an electric car can.
This can be solved by applying better domain naming, a Car can be named PetrolPoweredCar and ElectricPoweredCar. Both classes can be more abstracted by extending from Vehicle base class.

4) Interface Segregation Principle

  • The principle states that the larger interfaces split into smaller ones. 
  • The implementation classes use only the methods that are required. 
  • We should not force the client to use the methods that they do not want to use.
  • Suppose, we have created an interface named Connection having four methods open(), close(), receive() and send().
1
2
3
4
5
6
public interface Connection {
	void open();
	void close();
	void receive();
	void send(byte[] data);
}

After we applied ISP, we ended up with two different interfaces, with each one representing one exact role.

1
2
3
4
5
6
7
8
9
public interface Channel {
    void receive();
    void send(byte[] data);  
}

public interface Connection {
    void open();
    void close();  
}

 5) Dependency Inversion Principle
  • High-level modules should not depend on low-level modules. Both should depend on abstractions.
  • Abstractions should not depend upon details; details should depend upon abstractions. 
  • This aims to reduce the coupling between the classes by introducing abstraction between the layer.
You go to a local store to buy something, and you decide to pay for it by using your debit card. So, when you give your card to the clerk for making the payment, the clerk doesn’t bother to check what kind of card you have given.

Even if you have given a Visa card, he will not put out a Visa machine for swiping your card. The type of credit card or debit card that you have for paying does not even matter; they will simply swipe it. 

So, in this example, you can see that both you and the clerk are dependent on the credit card abstraction and you are not worried about the specifics of the card. 

Wednesday, April 27, 2016

Selenium WebDriver

What is Selenium?
Selenium is an open source automated testing suite for web applications across different browsers and platforms. It is quite similar to HP Quick Test Professional (QTP) only that Selenium focuses on automating web-based applications.

Selenium is not just a single tool but a suite of software's, each catering to different testing needs of an organization. 

The webdriver proves itself to be better than both Selenium IDE and Selenium RC in many aspects. It implements a more modern and stable approach in automating the browser's actions. Webdriver, unlike Selenium RC, does not rely on JavaScript for automation. It controls the browser by directly communicating to it.
Selenium WebDriver

Supported languages:
  • Java
  • C#
  • PHP
  • Python
  • Perl
  • Ruby

Supported Browsers:
  • Internet Explorer
  • Firefox
  • Google Chrome
  • Opera
  • HTMLUnit
Supported browsers for Selenium

Selenium webdriver Architecture:
It is very important to know how webdriver tool works and how it is designed. This will helps to take the good advantage of the tool at the same time it will helps to make right automation framework.

Following figure shows the architecture of selenium webdriver.


Selenium webdriver architecture

Selenium webdriver architecture mainly consist of three components
  1. Language level bindings
  2. Selenium webdriver API
  3. Drivers

1) Language Level Bindings :
At the Left hand side of the above figure, there are some bindings and these are language level bindings and with the help of that you can implement the Selenium webdriver code. In simple words they interact with the Selenium webdriver and work on various browsers. So we have a common API that we use for Selenium that has a common set of commands and we have various bindings for the different languages. So you can see there’s Java, Java, Python, Ruby, there’s also some other bindings and new bindings can be added very easily.

2) Selenium webdriver API:
Bindings communicate with Selenium webdriver API and and these API send the commands taken from language level bindings interpret it and sent it to respective driver. Basically it contains set of common library which allow to send command to respective drivers.

3) Drivers:
On right hand side of the figure, you see we have various internet browser specific drivers such as IE driver, a Firefox, Chrome, and other drivers such as HTML unit which is an interesting one. HTML unit driver works in headless mode which make test execution faster. The basic idea here is that each one of these drivers knows how to drive the browser that it corresponds to.

How exactly it works:
Let say you have written test using java (binding code) against Selenium API and that binding code is going to issue commands across webdriver wire protocol. This is a rest-based web service that is able to interpret those commands. The driver server is just a little executable that runs each one of the drivers has this driver server that basically listens on a port on your local machine when you run your tests and it’s waiting for these commands to come in. When these commands come in it interprets those commands and then automates the browser and then returns those results back.

In above section, we have covered the basic overview of Selenium webdriver. Now start your selenium-java test automation learning journey from part 1 and be master in it within few weeks..


  1. Core Java
  2. Selenium Webdriver
  3. TestNG
  4. Jenkins